Effects
Noise Reduction
Remove steady background noise by first profiling it, then filtering the whole recording.
Noise Reduction works in two passes. First you show it a stretch of the recording that contains only the noise — hiss, hum, air conditioning — so it can learn the spectrum you want gone. Then you select the audio to clean and apply the filter. It suits constant background noise; it will not remove one-off sounds like a door slam.
Where to find it
Effect → Noise removal and repair → Noise reduction, with audio selected.
Controls
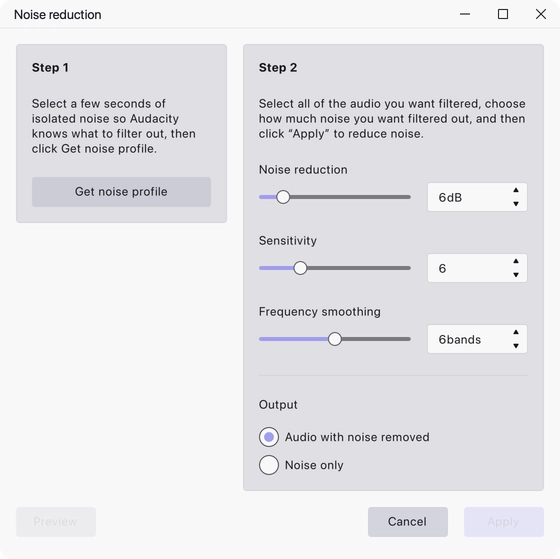
The dialog is laid out as two steps.
Step 1 — select a few seconds of isolated noise, then press Get noise profile. Audacity analyses that selection and remembers what the noise looks like.
Step 2 — select all the audio you want filtered, set the sliders, and apply.
- Noise reduction — how much the noise is attenuated, in dB. Range 0 to 48 dB, default 6 dB.
- Sensitivity — how readily a sound is judged to be noise rather than signal. Range 0.01 to 24, default 6.
- Frequency smoothing — how far the reduction is spread across neighbouring frequency bands. Range 0 to 12 bands, default 6.
- Output — choose between Audio with noise removed and Noise only.
Notes
The profile has to come from noise alone. If the selection you profile contains any of the wanted audio, that content is treated as noise too and the filter will eat into it.
Noise only is a checking tool rather than a result: apply it, listen to what is about to be removed, and if you can hear the signal in there the settings are too aggressive. Undo, back the sliders off and try again.
Push Noise reduction too far and you get the metallic, watery artefacts that noise reduction is notorious for. A modest reduction that leaves some noise behind usually sounds better than a total kill.
Because the effect expects you to profile a small isolated stretch first, it does not fall back to operating on the whole project when nothing is selected.
Last updated