Timeline
Timeline
The ruler above the tracks — reading the time scale, moving the playhead, and setting a loop region.
The timeline is the ruler running along the top of the tracks area. It shows the project’s time scale, carries the playhead, and holds the loop region. The grid lines drawn behind the tracks follow the same ticks as the ruler, so what you see on the ruler is what you see across the waveforms.
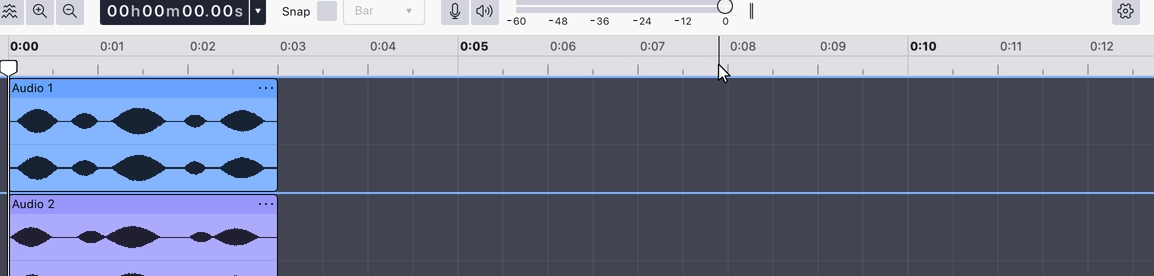
Reading the ruler
The ruler can label time in two ways: Minutes & seconds for clock time, or Beats & measures for musical time. Either way, the tick spacing changes as you zoom, so the labels stay readable at every zoom level.
Using the ruler
The ruler is split into two halves, top and bottom, which behave differently:
- Lower half — click to move the playhead to that point. Whether playback also starts there is controlled by Click ruler to start playback.
- Upper half — the loop region strip. When no loop region exists, hold Ctrl and drag here to draw one; drawing a region turns looping on. Once a region exists, drag either edge to resize it, drag its middle to move it, or click inside it without dragging to turn looping off and on. Dragging follows the current snapping setting, and a guideline shows where the edge will land.
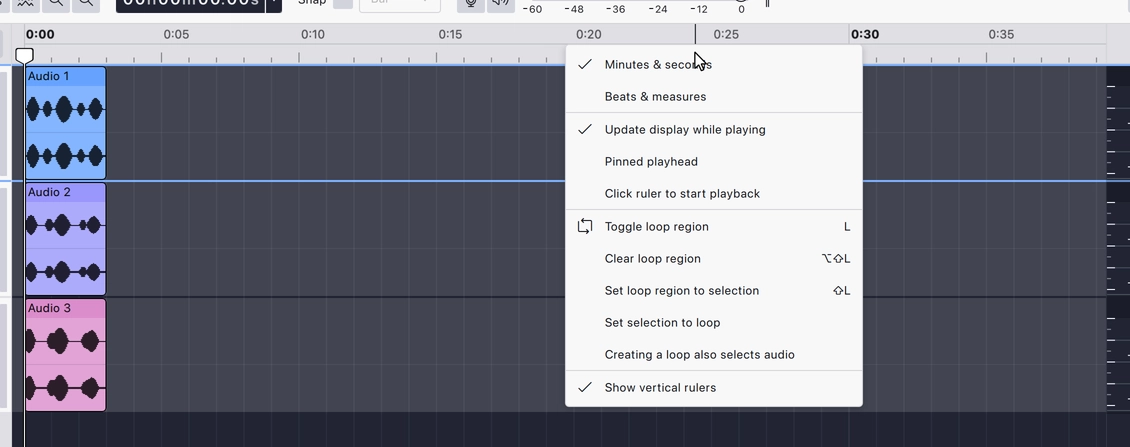
Right-click anywhere on the ruler for the timeline options below.
Ruler options
The right-click menu holds four groups of options:
- The ruler format — Minutes & seconds or Beats & measures.
- How the view behaves during playback — Update display while playing, Pinned playhead and Click ruler to start playback.
- The loop region — Toggle loop region, Clear loop region, Set loop region to selection, Set selection to loop and Creating a loop also selects audio.
- Show vertical rulers, which turns on the per-track amplitude scale at the right-hand edge of the tracks area.
The pages below cover each option.
- Minutes & Seconds Label the timeline ruler in clock time rather than bars and beats.
- Beats & Measures Label the timeline ruler in bars and beats, following the project tempo and time signature.
- Update Display while Playing Let the view scroll to follow the playhead during playback and recording.
- Pinned Playhead Keep the playhead centred in the view and scroll the audio past it.
- Click Ruler to Start Playback Make a click on the timeline ruler start playing, not just move the playhead.
- Toggle Loop Region Turn looping on and off without disturbing the loop region itself.
- Clear Loop Region Remove the loop region from the timeline entirely.
- Set Loop Region to Selection Make the loop region match the current selection.
- Set Selection to Loop Make the selection match the current loop region.
- Creating a Loop also Selects Audio Keep the selection in step with the loop region as you draw or adjust it.
- Show Vertical Rulers Show or hide the per-track amplitude scale at the right-hand edge of the tracks area.
Last updated