Tracks
Audio Track Item
The control panel of a mono or stereo audio track.
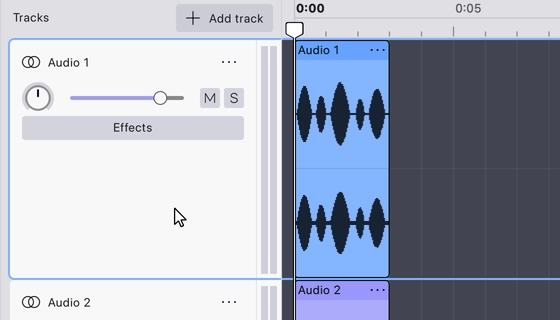
An audio track’s control panel carries, from the top: the track type icon, the editable track name, and the track menu button. Below the name sits a row holding the pan knob, the volume slider and the mute and solo buttons, and below that a full-width Effects button. A pair of level meters runs down the right-hand edge of the panel — one bar for a mono track, two for a stereo track.
Reduce the track’s height far enough and the panel collapses. The pan knob, volume slider and Effects button are hidden, and the mute and solo buttons move up to sit beside the track name so they stay reachable.
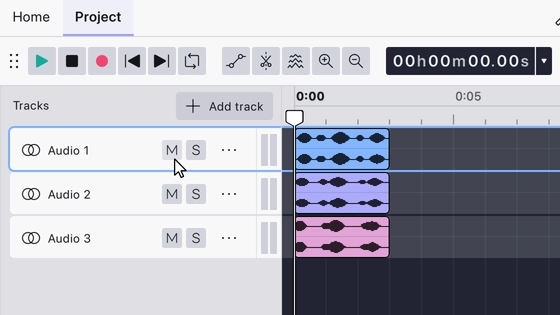
Everything on the panel except the meters can also be reached with the keyboard: tab moves from the track itself into its header controls, and then on to the clips in the track.
Mono and stereo
An audio track is mono or stereo. A mono track holds one channel and draws one waveform, with a single meter bar; a stereo track holds two, drawn stacked, with a pair of meter bars. Clips move freely between mono and stereo tracks.
The track menu converts between the two: Make stereo track combines a mono track with the mono track directly below it, and a stereo track’s menu offers Split stereo to L/R mono and Split stereo to center mono, plus Swap stereo channels.
Mute
Mute is a toggle button on an audio track’s control panel, next to Solo. While it is switched on the track is not heard during playback. Nothing about the audio itself changes — muting is a playback state, and it can be switched on and off at any time.
A muted track’s level meters read nothing, since no signal is leaving the track.
Mute is stored per track and saved with the project.
When the track is collapsed, mute and solo move up beside the track name so they remain available.
Solo
Solo is a toggle button on an audio track’s control panel, next to Mute. While any track in the project is soloed, only the soloed tracks are heard on playback; everything else is held back. Soloing more than one track lets you listen to that group together.
Solo is a playback state and changes nothing about the audio, so it can be switched on and off freely while you work.
Solo is stored per track and saved with the project.
When the track is collapsed, solo and mute move up beside the track name so they remain available.
Volume
The volume slider sets how loud an audio track plays back, relative to the audio it contains. It runs from -60 dB to +12 dB, with 0 dB — no change — in the middle of that range. A tooltip follows the handle while you drag, showing the current value in dB.
- Drag the handle, or click anywhere along the slider, to set a value.
- Hold Shift while dragging for fine adjustment; the slider then moves far more slowly than the pointer.
- Double-click the slider to reset the track to 0 dB.
- With the slider focused, the up and down keys step the value.
The slider is hidden while the track is collapsed. It affects playback only — the audio in the track is left untouched.
Panning
The pan knob places an audio track in the stereo field. It runs from 100
left through centre to 100 right, in steps of 1. A tooltip appears while
you use it, reading Pan: followed by the value — for example 50L or
50R. At the centre position the value is shown with no direction letter.
- Drag the knob to set a value. Dragging works both vertically and horizontally.
- Double-click the knob to return the track to centre.
- With the knob focused, the up and down keys step the value by 1.
The knob is hidden while the track is collapsed. Panning is a playback setting; the audio in the track is not altered.
Meters
A narrow vertical meter runs down the right-hand edge of every audio track’s control panel, showing the level leaving that track while it plays or records. A mono track has one bar; a stereo track has two side by side, the left channel first.
Each bar shows the current peak level with an RMS reading drawn over it, plus a marker holding the highest peak reached. If the signal clips, the bar switches to its clipped colour and stays there until the meter is cleared.
Click the meters to clear them, which resets both the peak-hold marker and the clipping indication. They are also cleared automatically when playback or recording starts, and when the track loses focus.
The meters read in dBFS, loudest at the top. A muted track shows no level.
Effects
Effects is a full-width button across the bottom of an audio track’s control panel. It opens the effects panel for that track, where its chain of realtime effects is built and managed.
The panel shows the track’s name with a power button beside it that bypasses or re-enables the whole chain at once, the list of effects currently on the track, and an Add effect button that opens the list of available effects. Individual effects in the list can be bypassed, reordered and removed.
Realtime effects are non-destructive: they are applied as the track plays, so they can be changed or removed at any time without altering the audio.
The button is hidden while the track is collapsed, or when the track is too short for it to fit.
See Apply your first effect for a fuller walkthrough.
Track options
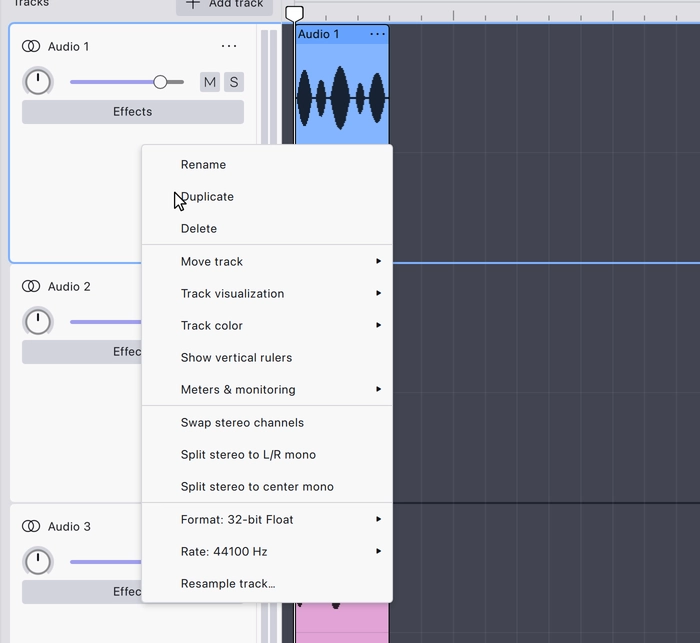
Every audio track has a menu holding the options that do not fit on the
control panel itself. Open it with the menu button beside the track name, by
right-clicking anywhere on the control panel, or — with the track focused —
with
On a mono track the three stereo channel commands are replaced by Make stereo track, which is available only when exactly one track is selected and the track directly below it is also mono. It combines the two into a single stereo track.
Rename, Duplicate and Delete
The track menu opens with three commands that act on the whole track.
- Rename puts the track’s name into edit mode in the control panel. Type the new name and confirm it.
- Duplicate makes a copy of the track, with its audio, and adds it to the project.
- Delete removes the track and everything in it from the project.
Renaming can also be started without the menu: double-click the track name in the control panel.
All three are undoable.
Move track
Move track is a submenu of the track menu holding four commands:
- Move track up — swap the track with the one above it.
- Move track down — swap it with the one below.
- Move track to top — send it to the top of the project.
- Move track to bottom — send it to the bottom.
None of the four has a default keyboard shortcut; one can be assigned on the Shortcuts page in Preferences.
Tracks can also be reordered by dragging a control panel up or down. A drop indicator shows where the track will land.
Track visualization
In the current Audacity 4 alpha this submenu is called Track visualization. It sets how the selected track draws its audio, and holds:
- Waveform — the familiar amplitude view.
- Spectrogram — frequency content over time.
- Multi-view — waveform and spectrogram together, stacked in the one track.
- Half-wave — draw only the upper half of the waveform.
- Spectrogram settings… — opens the spectrogram settings for this track.
Waveform, Spectrogram and Multi-view are mutually exclusive; the one in use is ticked. Half-wave is a separate toggle that can be on alongside any of them.
The choice applies to this track only.
Track color
Track color is a submenu of the track menu offering nine colours: Blue, Violet, Magenta, Red, Orange, Yellow, Green, Turquoise and Cyan. Choosing one sets the colour the track’s clips are drawn in.
The colour currently in use is ticked, so the submenu doubles as a way of seeing which colour a track has been given.
Colour is a display property — it changes nothing about the audio. It is stored per track and saved with the project, and the change is undoable.
Show vertical rulers
Show vertical rulers is a tick-box item in the track menu. When it is on, a column of vertical rulers appears to the right of the tracks, giving each track a scale for the audio drawn in it. Turning it off hides the column and gives the space back to the waveforms.
Although it is reached from a single track’s menu, this is an application-wide setting rather than a per-track one: switching it on or off from any track affects the whole project view, and the setting persists between sessions.
Meters & monitoring
Meters & monitoring is a submenu of the track menu with two tick-box items:
- Show mic metering — display the level coming in from the recording input, so you can set levels before you record.
- Turn on input monitoring — pass the input through to your output so you can hear it live.
Both are application-wide settings rather than per-track ones. They are reached from a track’s menu, but switching either on or off applies to the application as a whole and persists between sessions.
Input monitoring can cause feedback if you are monitoring on speakers rather than headphones.
Swap stereo channels
Swap stereo channels exchanges the two channels of a stereo track: what was on the left is heard on the right, and the other way round. It is useful when a recording has come in with its channels the wrong way round. The command does not appear on mono or label tracks.
It acts on the selected tracks, so several stereo tracks can be swapped at once. The change is undoable.
Split stereo to L/R mono
Split stereo to L/R mono turns a stereo track into two separate mono tracks, one carrying the left channel and one the right. The two are panned hard left and hard right, so playback still sounds as it did before the split — but each channel can now be edited, and given its own volume, effects and mute or solo state, on its own. The command does not appear on mono or label tracks.
If you want the two channels panned centre instead, use Split stereo to center mono.
Split stereo to center mono
Split stereo to center mono turns a stereo track into two separate mono tracks, one carrying the left channel and one the right, with both panned to the centre. Each channel then plays through both speakers and can be edited, levelled and processed independently. It does not appear on mono or label tracks.
Because both tracks come out centred, the stereo image of the original recording is lost. To keep it, use Split stereo to L/R mono instead.
Format, Rate and Resampling
The last group of the track menu holds three items that deal with how a track’s audio is stored.
Format: is a submenu offering 16-bit PCM, 24-bit PCM and 32-bit Float. The one in use is ticked, and the submenu’s own title shows it — for example Format: 32-bit Float.
Rate: is a submenu listing the sample rates your current audio device supports, plus Other… for a rate that is not on the list. As with Format, the title shows the track’s current rate — for example Rate: 44100 Hz — and the rate in use is ticked. If the track is at a rate the device does not offer, Other… is the item shown as ticked.
Resample track… converts the audio in the track to a different sample rate.
Format and Rate are both disabled while a recording is in progress.
Last updated